


Are you in search of a cost-effective solution for achieving smooth, straight, and manageable hair without breaking the bank? Look no further than a DIY keratin treatment at home.
Salon-quality hair doesn't have to come with a hefty price tag. A DIY keratin hair treatment at home has become a popular alternative, allowing you to save money while still enjoying the same fantastic results. The best part? It's easier than you might think!
In this article, we'll guide you through the process of how to do a keratin hair treatment at home. From step-by-step instructions to valuable tips for optimal results, we've got you covered. So, whether you're looking to save money or just want to try something new, read on for everything you need to know about how to do keratin treatment for hair at home.
DIY Keratin Hair Treatment: The Basics
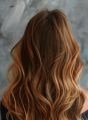
When you apply a keratin treatment at home, you're infusing your hair with a protein called keratin, which naturally exists in your strands. This treatment works its magic by filling in gaps, repairing damage, and creating a protective layer on your hair's cuticle. And the result? Smoother, more luscious locks that are easier to style and manage!
The best part about DIY keratin treatments is that you have control over the process. With the right products and a little know-how, you can achieve salon-quality results without the hefty price tag. Just follow the instructions provided with your chosen treatment and remember to do a patch test beforehand for a worry-free experience.
However, keep in mind that individual results may vary based on your hair's texture and care routine. The effects of a DIY keratin treatment typically last for weeks to months, gradually fading as your hair grows. So, let's unlock the magic of DIY keratin treatment at home and enjoy the confidence of salon-like hair, right on your terms!
DIY Keratin Hair Treatment: How to Get Salon-quality Hair
1. Start with a clean canvas

Use a clarifying shampoo to thoroughly cleanse your hair before applying the keratin treatment. This step removes any product buildup, excess oils, or impurities that can hinder the treatment's effectiveness. Make sure to massage the shampoo into your scalp and rinse thoroughly.
2. Section and conquer
Divide your hair into manageable sections to ensure thorough application of the keratin treatment. This technique ensures that every strand receives the treatment for consistent results. Use hair clips or ties to separate the sections, making it easier to work through your hair.
3. Apply the treatment generously

Take your time to apply the keratin treatment generously from root to end. Start at the nape of your neck and work your way up, ensuring that each section is coated. Use a fine-tooth comb to comb the treatment through your hair, distributing it evenly. This helps to ensure that all strands are covered, and that the product is absorbed properly.
4. Mind the timing
Follow the recommended processing time provided with your keratin treatment at home. This time is specifically designed to allow the treatment to work effectively on your hair. Set a timer to ensure you adhere to the recommended duration. Avoid leaving the treatment on for too long, as it can lead to over-processing and potential damage to your hair.
5. Seal in the treatment

Once the processing time is complete, it's time to seal in the keratin treatment. First, use a blow dryer on a low heat setting to partially dry your hair. This step helps to remove excess moisture and prepare your hair for the next step. Then, using a flat iron set to the appropriate temperature for your hair type, go over small sections of your hair. Slowly glide the flat iron from roots to ends, repeating as necessary. This process helps to lock in the keratin treatment and create a smooth, sleek look.
6. Let it settle
After sealing in the treatment, allow your hair to cool and settle before rinsing. This cooling period allows the keratin to bond with your hair and ensures longer-lasting results. Patience is key during this step, as rushing to rinse may compromise the treatment's effectiveness.
7. Extend the benefits

To maintain the effects of your keratin treatment at home, switch to sulfate-free shampoos and conditioners specifically formulated for keratin-treated hair. Sulfates can strip the treatment and cause it to fade more quickly. Look for products that are gentle, nourishing, and free from harsh chemicals. These specialized products help prolong the smoothness and manageability of your locks.
If you are looking for a shampoo that maintains the effects of your keratin hair treatment at home, use the TRESemmé Keratin Smooth Shampoo. This professional-grade formula restores your hair's keratin, leaving it visibly straighter and smoother. Infused with lightweight Argan Oil, this shampoo nourishes each strand, making your hair silky smooth and easy to manage. The unique combination of Keratin and Argan Oil strengthens your hair, provides hydration, and enhances elasticity. With its lower sulfate formulation and patented micro-moisture technology, it protects dry hair from damage and delivers long-lasting frizz control.
Follow it up with the TRESemmé Keratin Smooth Conditioner. Deeply condition and protect your hair with this nourishing formula that restores keratin and leaves your strands straighter and shinier. Infused with Keratin and lightweight Argan oil, this conditioner provides hydration, elasticity, and strength to your hair. With its dual action, this conditioner makes your hair 100% smoother and enhances shine. The lower sulfate formulation and patented micro-moisture technology control frizz for up to 3 days, giving you silky, manageable hair.
8. Be patient with washing
After the keratin treatment, it's essential to avoid washing your hair for the recommended timeframe provided with your specific treatment. This waiting period allows the keratin to fully set and bond with your hair, maximizing the longevity of the treatment's effects. Follow the instructions carefully to ensure the best results.
You can now say goodbye to frizz and hello to the confidence that comes with stunning hair. It's time to turn heads and embrace the sleek, shiny, and effortlessly gorgeous hair you deserve with the best keratin hair treatment at home!
FAQs about DIY Keratin Hair Treatment: How to Get Salon-quality Hair
Are DIY keratin hair treatments safe to use at home?
When done correctly and following the instructions provided with the product, DIY keratin hair treatments can be safe to use at home. It's important to choose high-quality products and conduct a patch test prior to the full application to ensure compatibility and avoid potential adverse reactions.
How long do the results of a DIY keratin hair treatment last?
The duration of the results can vary depending on factors such as your hair type, texture, and the specific product used. Generally, the effects of a DIY keratin hair treatment can last for several weeks to a few months. However, it's important to note that the treatment gradually fades as your treated hair grows out.
Can DIY keratin hair treatments be used on all hair types?
DIY keratin hair treatments can be used on various hair types, including straight, wavy, and mildly curly hair. However, it's important to choose a product that is suitable for your specific hair type and follow the instructions accordingly.


 Privacy Notice
Written by Kinnari Ashar on 13th Jul 2023