


Raise your hand if you are someone who loves getting massages. Massages are therapeutic and relaxing, and quite frankly, we wish we could get one every week. But when you think of massages, what’s the first thing that comes to your mind? Obviously body and head massages, right? We rarely ever consider getting a facial massage. In fact, most spas don’t even include it as a key service.
Well, Lamiya Chitalwalla from the BB Beauty Squad is about to show you how to give yourself a facial massage at home.
But first, let’s check out the benefits of a facial massage.
Benefits of Facial Massage
1. Reduces stress
The pressure points on the face are connected to the various systems in the body. When these pressure points are massaged, your body responds positively, resulting in reduced anxiety levels and an uplifted mood.
2. Prevents Ageing
Facial massages also boost cell regeneration and promote collagen development. In short, you’re going to delay the ageing process and have younger-looking skin.
3. Promotes Blood Circulation
Facial massages are known to improve blood circulation, which results in the cells getting more oxygen and nutrients; and healthier cells mean glowing skin!
Before we begin, here are 3 rules for doing a facial massage right:
- Apply medium pressure.
- Make sure your face and hands are clean and fingernails short.
- Touch your face with TLC - be gentle and mindful.
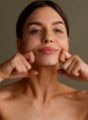
Step 01: To start with the facial massage, apply some moisturiser or face oil so that your face stays hydrated. Then place your fingers on your forehead and move them in a zigzag motion, stretching your skin in opposite directions. Follow that up by tapping your fingers across the forehead. This relaxes the tensed muscles on your forehead and stimulates blood flow, tightening pores and smoothening frown lines if any. Repeat this around 8 to 10 times.
Step 02: Next with the help of your thumb and index finger, start pressing the temples of your head and slowly move from the left to the right in circular motions. This will further reduce the stress and the tension in your forehead, helping you relax. Repeat this for 30 seconds continuously.
Step 03: Now, it’s time to deal with your under eyes. Use your middle finger and ring finger to move across your under eyes in a “U”. Make sure that you do not apply too much pressure. This will help you get rid of the puffiness under your eyes and increase the blood flow in that region as well.
Step 04: Now place four fingers on your cheekbones and move them in upward strokes. Start from the centre of your cheekbones to the top. This gives your cheeks a soft, pink glow by increasing the blood circulation in that area.
Step 05: Look upwards and using the corner between the thumb and forefinger, Drag across your jawline in a downward motion. This will flush out all the toxins from your face and help you relax further. Do this for about 5 to 10 times.
Step 06: To end, gently place your hands over your face and take a few deep, relaxing breaths.


 Privacy Notice
Written by Riya Jain on 27th Mar 2020
Author at BeBeautiful.